Moving In and Out of Smart Homes

How to move your smart home and devices to your new home.

One of the best things about a smart home is that it can be customized to accommodate your preferences and anticipate (almost) every need. But what happens when you decide it’s time to move? We’ve compiled this handy guide to mastering the art of moving in the age of smart homes.

Moving Out of a Smart Home

You probably already have a smart home hub that connects your security system, lights, and thermostat, all while turning on your coffee maker every morning. But some automated systems require control panels to be installed and wired right into the walls of your home, which makes relocating difficult. If you have to say goodbye to some or all of your current smart home tech, here’s how to do it right:

  • Take inventory: Make a list of all your connected devices, user manuals, vendor websites, customer support contacts, and any other information relevant to your smart home system.
  • Get disconnected: You don’t want the new owners of your home to have access to your information. As soon as you know your move-out date, take action to disable all administrative and user access.
  • Let everyone know: Alert vendors and manufacturers about the pending change in ownership, and leave the vendor information and equipment manuals with your real estate agent to hand over to the next occupants.
  • Clean the slate: It’s likely that your temperature preferences will not be the same as the next owners’. Reset programmed or learning devices, like smart thermostats, to factory defaults. This makes it easy for the next family to train the system their way.
  • Update software: This is a security must — for both you and the people who will be moving in. Make sure all smart devices and software are up-to-date to ensure the latest security and encryption protection from hackers.

Taking Your Smart Home with You

Some smart home systems and equipment don’t have to be left behind. If you move a lot, these are the best ways to take advantage of smart home tech without losing your mobility:

  • Opt for portable smart hubs: Make sure you can take your smart home with you by choosing an easily movable hub, like those from Google. These hubs can be just as powerful as integrated home automation systems, but they don’t require drilling or hard-wiring to install.
  • Use smart switches and outlets: You can automate your small appliances and lighting by changing out ordinary switches for smart ones. There are some DIY solutions that help you connect all of your corded electronics to your hub and to each other. The best part is how easy they’ll be to unplug and take with you the next time you move.
  • Leave the equipment, take the service: If you already have a smart home but don’t want to deal with tearing out the wall-mounted control panel yourself, check with your provider. Many smart home tech companies will want you to keep the service you already enjoy, and they may offer supplementary devices or installation services for your new house

Moving into a Smart Home

Whether you’re building a new house or buying one, moving is the perfect opportunity to reconfigure — or start — your smart home operation. If you’re ready to get started with some new smart home tech, keep these tips in mind:

  • Work with what you have: You may already have some smart devices that will be moving with you. Double-check compatibility between existing smart home technology in your new home and any smart gadgets you already own.
  • Clear the decks: If you’re moving into a smart home that was set up by former residents, verify that all prior owner access has been disabled.
  • Watch the budget: A smart home is definitely convenient, but it takes an investment to get things going. Keep in mind that things like smart lightbulbs are more expensive, but they should save you money in the long run on your power bill.

If you run into any issues during your move, don’t hesitate to consult with a home automation pro or reach out to a device’s manufacturer. Got any tips from firsthand experience on moving your smart home?

Recent Articles

Alex Rivera

July 10, 2023 • 3 min read

Alex Rivera

July 10, 2023 • 2 min read

Alex Rivera

July 7, 2023 • 2 min read

Back to top

Organize Your Jewelry, DIY Style

Do you have 30 minutes? It's time to get crafty!

Have you ever had one of those days where your want-to-do list keeps tapping you on the shoulder, looking at you with puppy-dog eyes, saying, “Please. Please pick me! I’ll be fun and fulfilling, I promise.” And then there’s your much-longer need-to-do list, who is managing to give you panic attacks every time you get a glance of it out of the corner of your eye. Which one would you pick? Here’s a DIY project that mixes both together to give you a greta-looking jewelry organizer. And who knows, maybe you really NEED somewhere to organize your jewelry today. You’ve just had it with the tangled necklaces and mismatched earrings. No judgement, just saying.

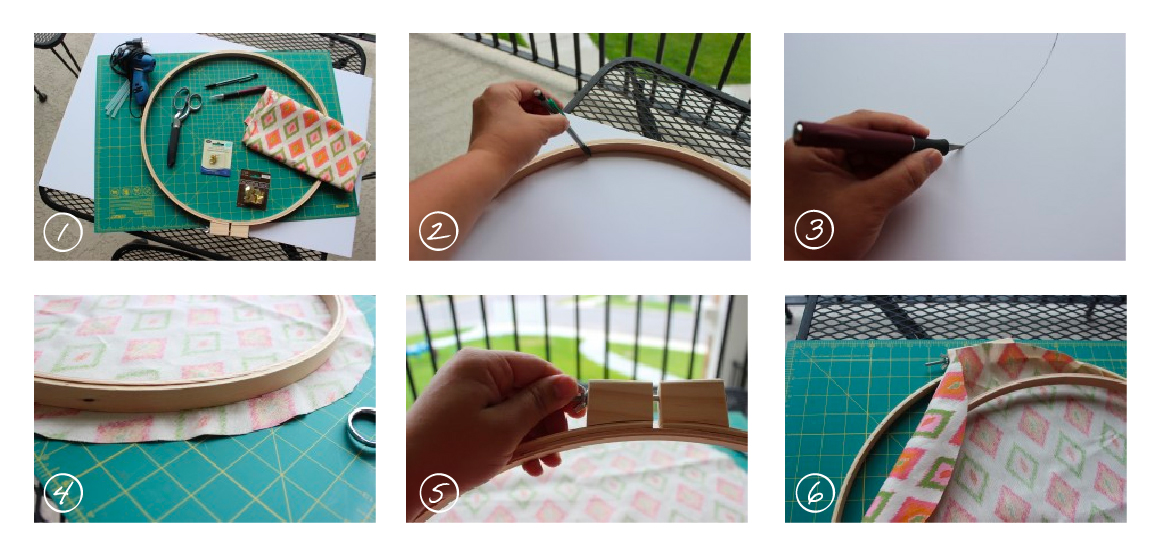
What you’ll need (30 minutes to make):

  • Foam core, preferably white, unless your fabric is dark
  • Self-healing cutting mat, or other surface (like cardboard) that is ok to cut into
  • Hot glue gun, plus extra glue sticks
  • Embroidery hoop, around 18″
  • Fabric scissors
  • Pencil, or pen
  • X-ACTO knife
  • Decorative tacks
  • Small cup hooks
  • Fabric of your choice (for example, 5/8ths of a yard for an 18″ embroidery hoop)
  • 1 Nail (not pictured)

Instructions

  1. Gather your supplies.
  2. Trace the inside of the hoop onto the foam core with your pencil.
  3. Place your foam core onto your cutting mat, and you will cut along your line very carefully with your X-ACTO knife. Take it slow. There’s no rush. Tip: Turn the board as you cut, rather than walking around the table to cut the circle out. Once it’s cut out, try “popping” it into your hoop. It should fit pretty snug, and you should have to finagle it in there, without bending the foam core, of course. If it needs some trimming, have at it. But remember, take it slow. Small slivers off at a time, if needed.
  4. Once the foam core fits to your liking, take it out. Lay your fabric out, wrong side up. Trace loosely with your pencil onto the fabric about 2-3 inches wider than the hoop. Then cut it out.
  5. Loosen the hoop by unscrewing the screw at the top, so that the inside hoop comes out.
  6. Layer the outside hoop on bottom, then fabric face-down, then inside hoop. Push the inside hoop in so it’s snug and fabric is tight.
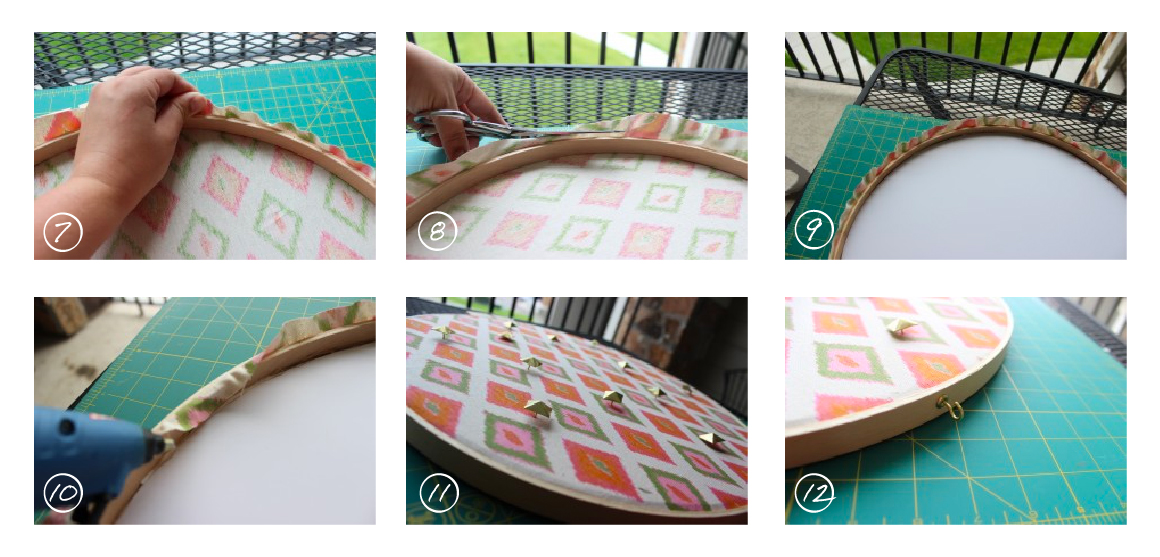
  1. Pull the edges of the fabric up so that everything is snug. Trim the extra fabric so there is about 1″ of fabric sticking out of the hoops.
  2. Pop your foam core back in and press it against the fabric.
  3. Hot glue around the edges of the foam core. Hot glue the fabric down towards the foam core.  You’re not going to see the back, so don’t worry about making it look pretty.
  4. Flip it over to the pretty side. Put your tacks in however you’d like.
  5. Screw the hooks into the bottom of the hoop. These are so teeny that you can just do it with your hand.
  6. Now you’ll just need one nail to put into your wall. Nail it in there, leaving the head of the nail an inch or less out from the wall. Hang your hoop onto the nail. You might need to do some teetering to make it hang straight. Hang your bracelets and necklaces on it and you can now cross that pesky need off your list.

Recent Articles

Alex Rivera

July 10, 2023 • 3 min read

Alex Rivera

July 10, 2023 • 2 min read

Alex Rivera

July 7, 2023 • 2 min read

Back to top

Top 7 Mortgage Tips and Tricks

Mortgage? Escrow? Insurance? Here are some mortgage tips to make your budgeting plans make sense.

American households spend an average of 25.8% of total average earnings on housing costs, from mortgages to property taxes. While this falls under the 28% rule, there’s no harm in saving even more for daily living expenses or paying off debts. One of the best ways to lower housing costs is to reduce your mortgage. Here are seven mortgage tips and hacks that won’t hurt your credit or put you into further debt.

1. Refinance to a lower interest rate

One popular way to reduce your mortgage payment is to refinance to a lower interest rate. With a reduced rate, you will have lower monthly payments, which come with less interest. One downside to refinancing is that you can expect to spend three to six percent of your loan principal on closing costs. Make sure refinancing will lower your interest rate enough to cover your closing costs and save you money in the long run.

2. Refinance to a shorter-term mortgage

Another way to change your mortgage is to refinance to a shorter-term loan. Most homeowners have a 30-year mortgage, but you can significantly reduce your interest rate and pay off your loan faster by refinancing to a 15-year mortgage. While you will incur closing costs for the refinancing process and have a higher monthly payment, a 15-year term will help you finish paying your mortgage sooner.

3. Pretend you have a shorter-term mortgage

Refinancing to a shorter-term loan requires you to make higher monthly payments, which can be a burden for many. Instead of spending the time and money to refinance, an alternative is to pay as if you have a shorter-term mortgage. Aim to pay an additional one-twelfth of your payment (principal and interest) each month — about $50 on a $600 payment. This is the equivalent of making an additional monthly payment each year. You’ll pay off your loan a few years early and save money in interest. Check with your loan company on any rules regarding making payments above your minimum.

4. Set up biweekly payments

An easy and automated way to pay off your loan faster is to follow a biweekly payment plan. You likely have an escrow account specifically for your mortgage payments. Every other week, put half of your monthly payment in that account. With this method, you will put 26 half payments, or 13 full payments, in your savings account. After a year of paying your regular monthly payments, you’ll have saved enough for an extra full payment. You can pay that extra amount as additional principal. As with the previous tip, check with your loan company first on any payment rules specific to your mortgage.

5. Reduce or eliminate your mortgage insurance

Some homebuyers are required by their lender to purchase private mortgage insurance (PMI). This may be your situation if you put less than 20 percent down on your home or refinanced with less than 20 percent equity. PMI typically costs between 0.5 and 1 percent of your entire loan amount — with a $200,000 loan, you could be spending $2,000 per year on this insurance. Luckily, you can reduce your PMI costs or remove them entirely if you meet certain conditions. Two ways to do this include paying down your mortgage balance to 80 percent of your home’s original appraisal value, or getting a new appraisal.

6. Reduce your homeowners insurance premium

If you have an escrow account, a portion of your homeowners insurance payment goes there with your mortgage. While homeowners insurance is essential, there are ways to reduce costs without sacrificing quality coverage. The simplest way is to request new quotes from different insurance companies and switch to the policy with the lowest price. Another option is to reevaluate your current coverage and look for ways you can save. For example, if you’ve recently installed a security system or other safety enhancements, you may be eligible for a discount. When in doubt, ask your insurance agent.

7. Invest your escrow check back into your mortgage

Payments for your homeowners insurance and property taxes come out of your escrow account. Each year, your escrow account is analyzed to evaluate any insurance or tax fluctuations that result in either a payment shortage or overage. If you paid less than anticipated, your lender will send you a refund check for the surplus amount. Instead of cashing that check, use the money to make extra payments toward the principal balance of your mortgage. This won’t change your monthly payment total, but it does decrease your loan balance. A home loan can seem overwhelming, but there are many ways you can tackle your high monthly mortgage and save money. By incorporating a few of these tips into your payment plan, you’ll feel more confident and in charge of your finances.

Recent Articles

Alex Rivera

July 10, 2023 • 3 min read

Alex Rivera

July 10, 2023 • 2 min read

Alex Rivera

July 7, 2023 • 2 min read

Back to top

Organizing Your Gear Throughout the Home

From the garage to the closet, here are some tips on organizing your gear wherever you can.

Are you an outdoor enthusiast? Do you spend as much time as possible biking, hiking, backpacking, or skiing? If so, you’ve probably accrued a decent amount of gear over the years. The good news is your high-quality equipment will last for a long time. However, the real challenge lies in figuring out where to store all of those pieces you’ve spent so long collecting. As any gear fanatic will tell you, when you’re faced with a finite amount of space — or more commonly a finite budget — creativity is the key to finding gear storage solutions.

In the garage

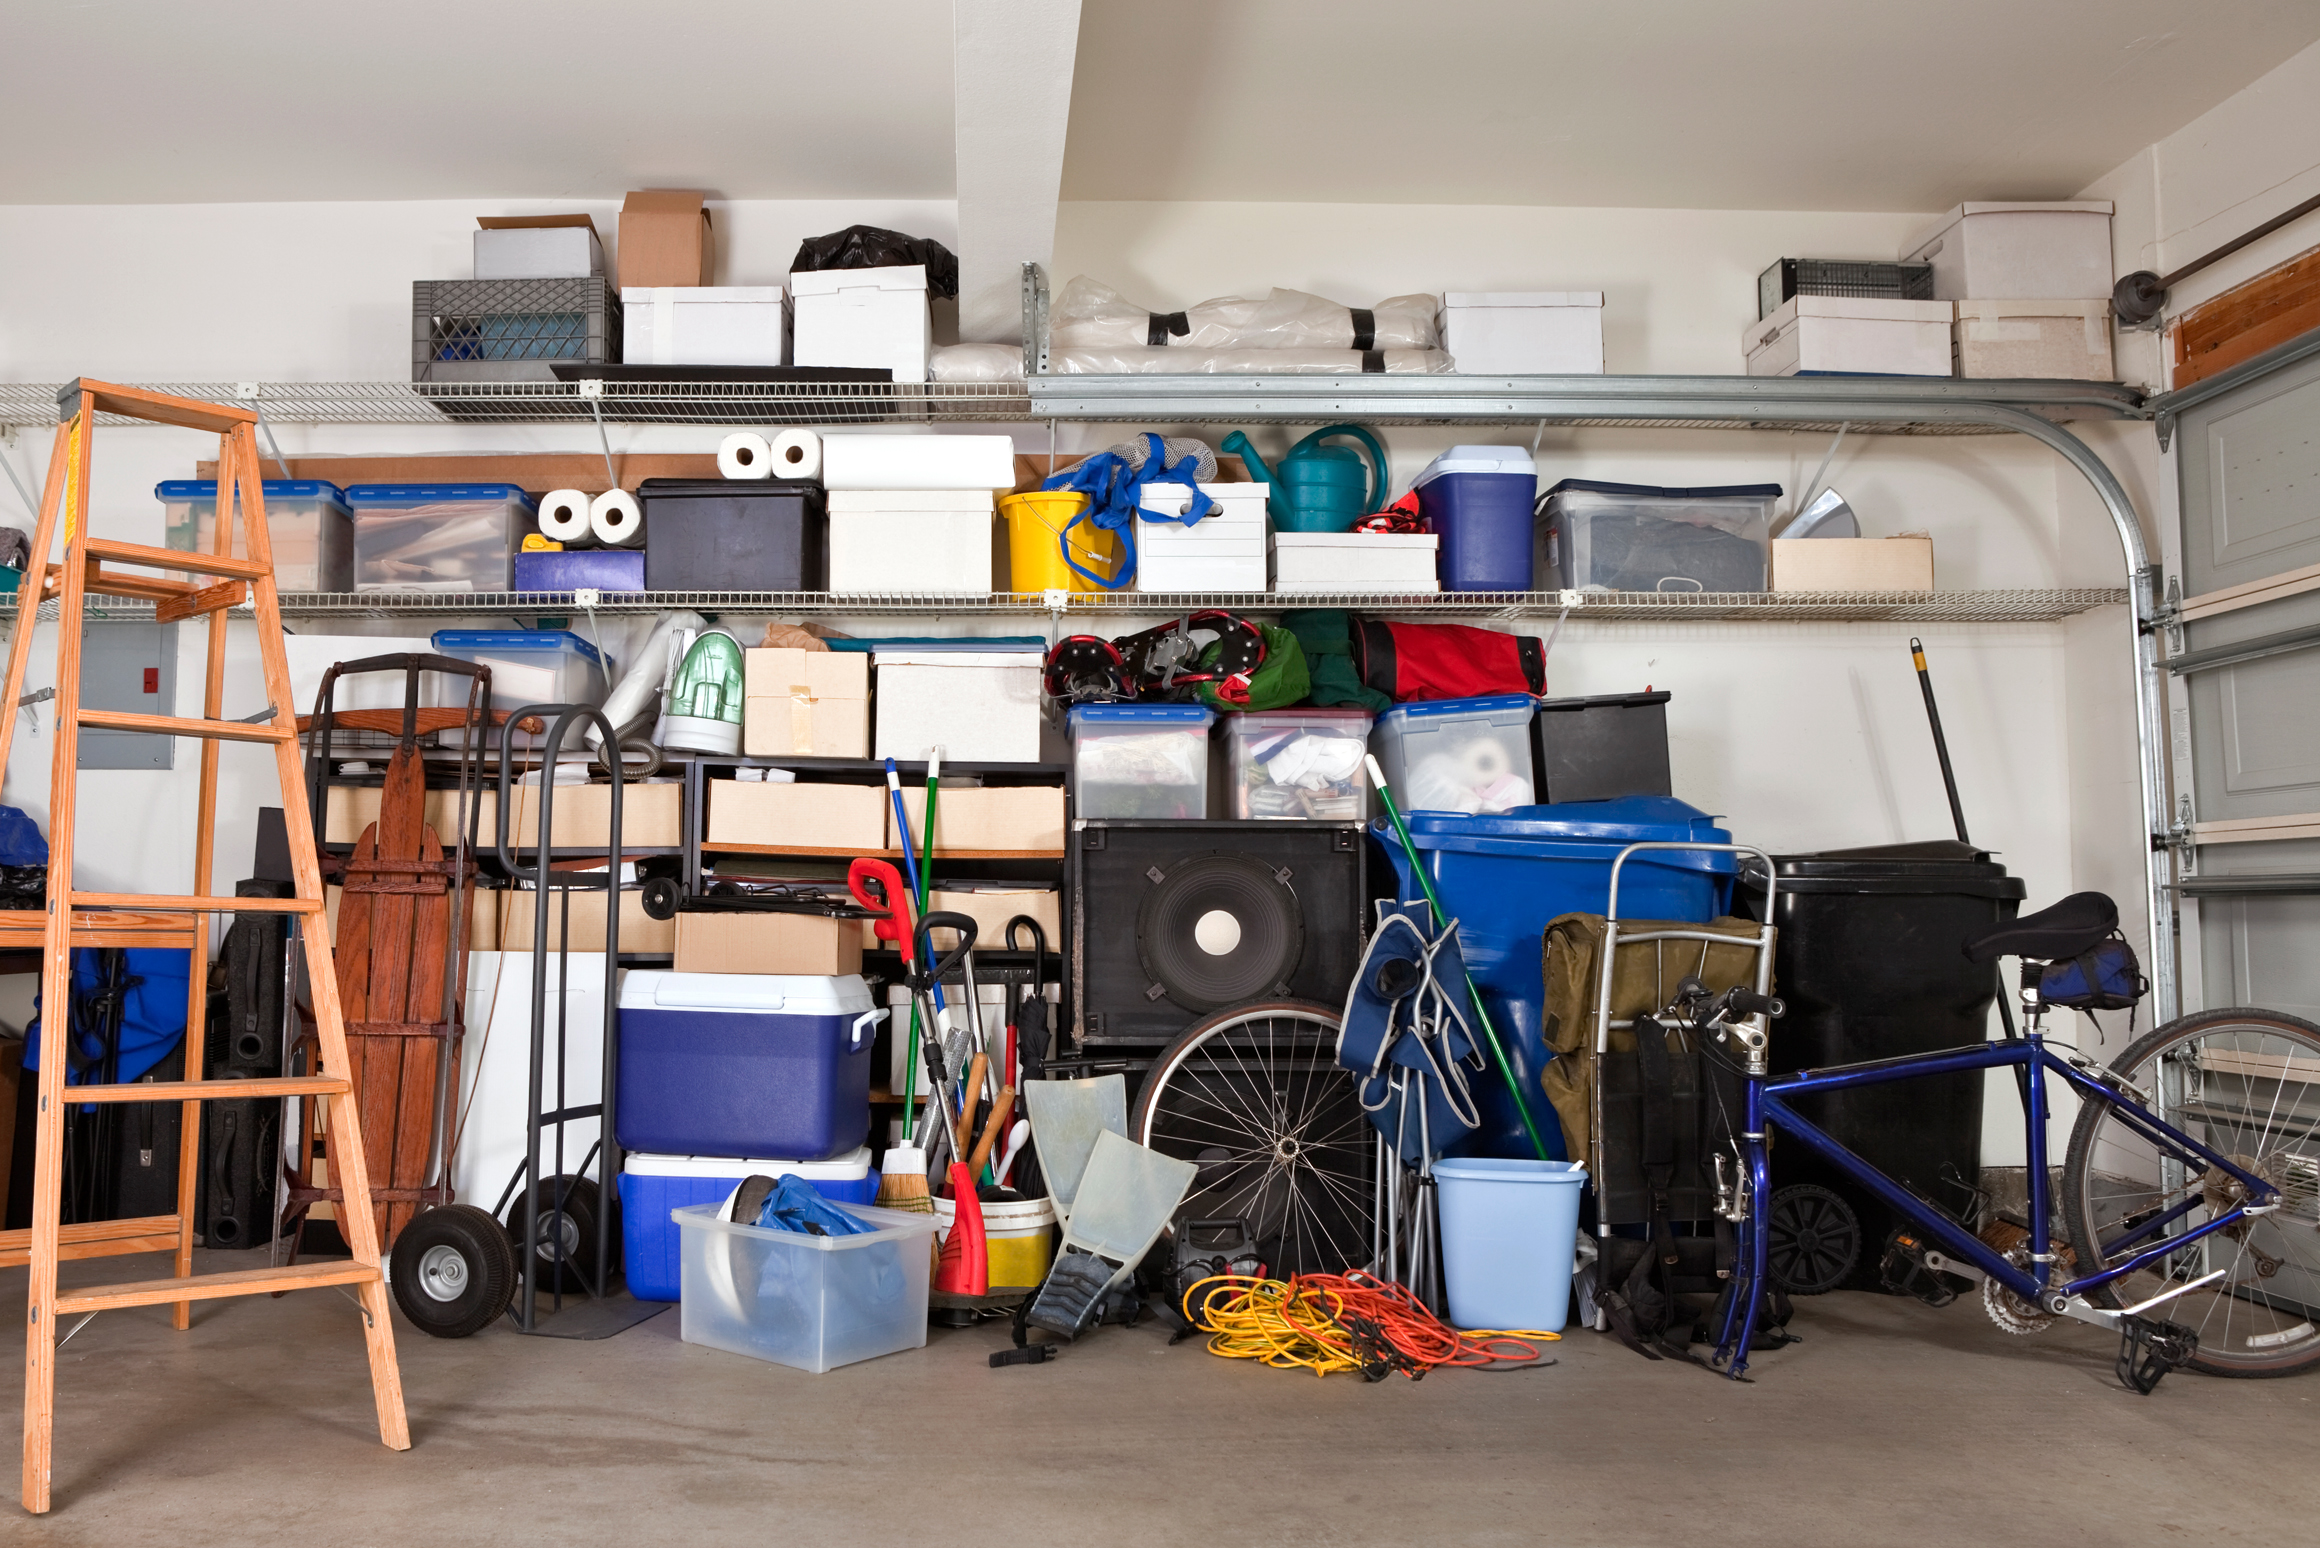
If you’re lucky enough to have a garage, then you’ve probably got more available space for storage. One of the best garage systems for big, bulky gear is heavy-duty shelving mounted on the ceiling. These shelves are perfect for getting everything — from coolers and camping chairs to crash pads and canoes — up off the floor. Depending on the height, you may even have room on the underside to hang a bike or two.

For those concerned about accessibility, there are plenty of ground-level shelving systems designed to make organizing simple. And, if you don’t want to deal with shopping around for the perfect unit, building and mounting shelving systems is actually a fairly simple project. Just about any budget-conscious adventurer who owns some tools and isn’t afraid to tackle basic carpentry can handle it. Once you’ve got the bulk of your gear off the ground and onto your shelves, you can start fine-tuning your organization. Sturdy hooks and pegboard, for example, provide a great solution for climbing ropes, skis, and packs (which can also be stuffed with additional gear when not in use).

In the shed or basement

If you’ve got space in the basement, you can do a lot with a small clothing rack or wardrobe closet. These are great for keeping climbing gear or camping equipment organized in one central location. Plus, if you position the rack away from the wall, you can use the space behind to stash bigger stuff like crash pads. For out-of-sight sheds or storage rooms, another consolidation option is a large stuff sack. These tend to come with new sleeping bags for long-term storage, but they’re also great for loading soft goods like ground mats or camping tarps. These bags usually have a cinch cord too, making them easy to hang in the corner of a room.

Although not ideal for frequently used gear, stacking bins with lids can provide the perfect solution for sorting and organizing off-season equipment. They’re easy to sort, label, and transfer. Plus, if your basement doubles as a recreational room, you can drape a row or two of containers with a cool piece of fabric and use the top as kid-friendly play space for LEGOs or small toys.

In closets, cabinets, and cupboards

If all you’ve got to work with is your own living space and some interior closets, there’s not much else to do but make the very best of every available nook and cranny. To start, try allocating the entire corner of a closet for ceiling-to-floor shelving that can be used for smaller gear like helmets and boots. Corner space can provide a surprising amount of useful storage. In larger closets, opt for full shelving to hold bigger gear like tents, stoves, and coolers. Then use baskets and bins for keeping smaller things organized. If you’re especially ambitious, you can even find storage opportunities on the closet door itself by building additional shelving or hanging organizers.

If shelving isn’t an option at all, make use of the closet rod. You can sling packs and snow gear around regular clothing hangers, while carabiners offer a better option for rope coils, straps, or crampon storage bags. When space is just too tight, look for out-of-the-ordinary alternatives. Try loading any unused suitcases with sleeping bags and seasonal clothing, for instance. You can also check for openings in cabinets that aren’t in the bedroom or hall closets—while you may not want to store skin boots under the kitchen sink, you may find the perfect compartment for your tackle box. If all else fails, consider putting your teenage Tetris skills to practical use by rearranging your current storage layout to free up real estate elsewhere.

No matter how much (or little) space you have to work with, you can find viable storage solutions. With a little ingenuity, you’ll be able to neatly store all of your gear for easy access the next time you’re adventure-bound.

Recent Articles

Alex Rivera

July 10, 2023 • 3 min read

Alex Rivera

July 10, 2023 • 2 min read

Alex Rivera

July 7, 2023 • 2 min read

Back to top

Easy Landscaping Ideas for Summer

These easy, DIY landscaping ideas can turn your garden into a paradise.

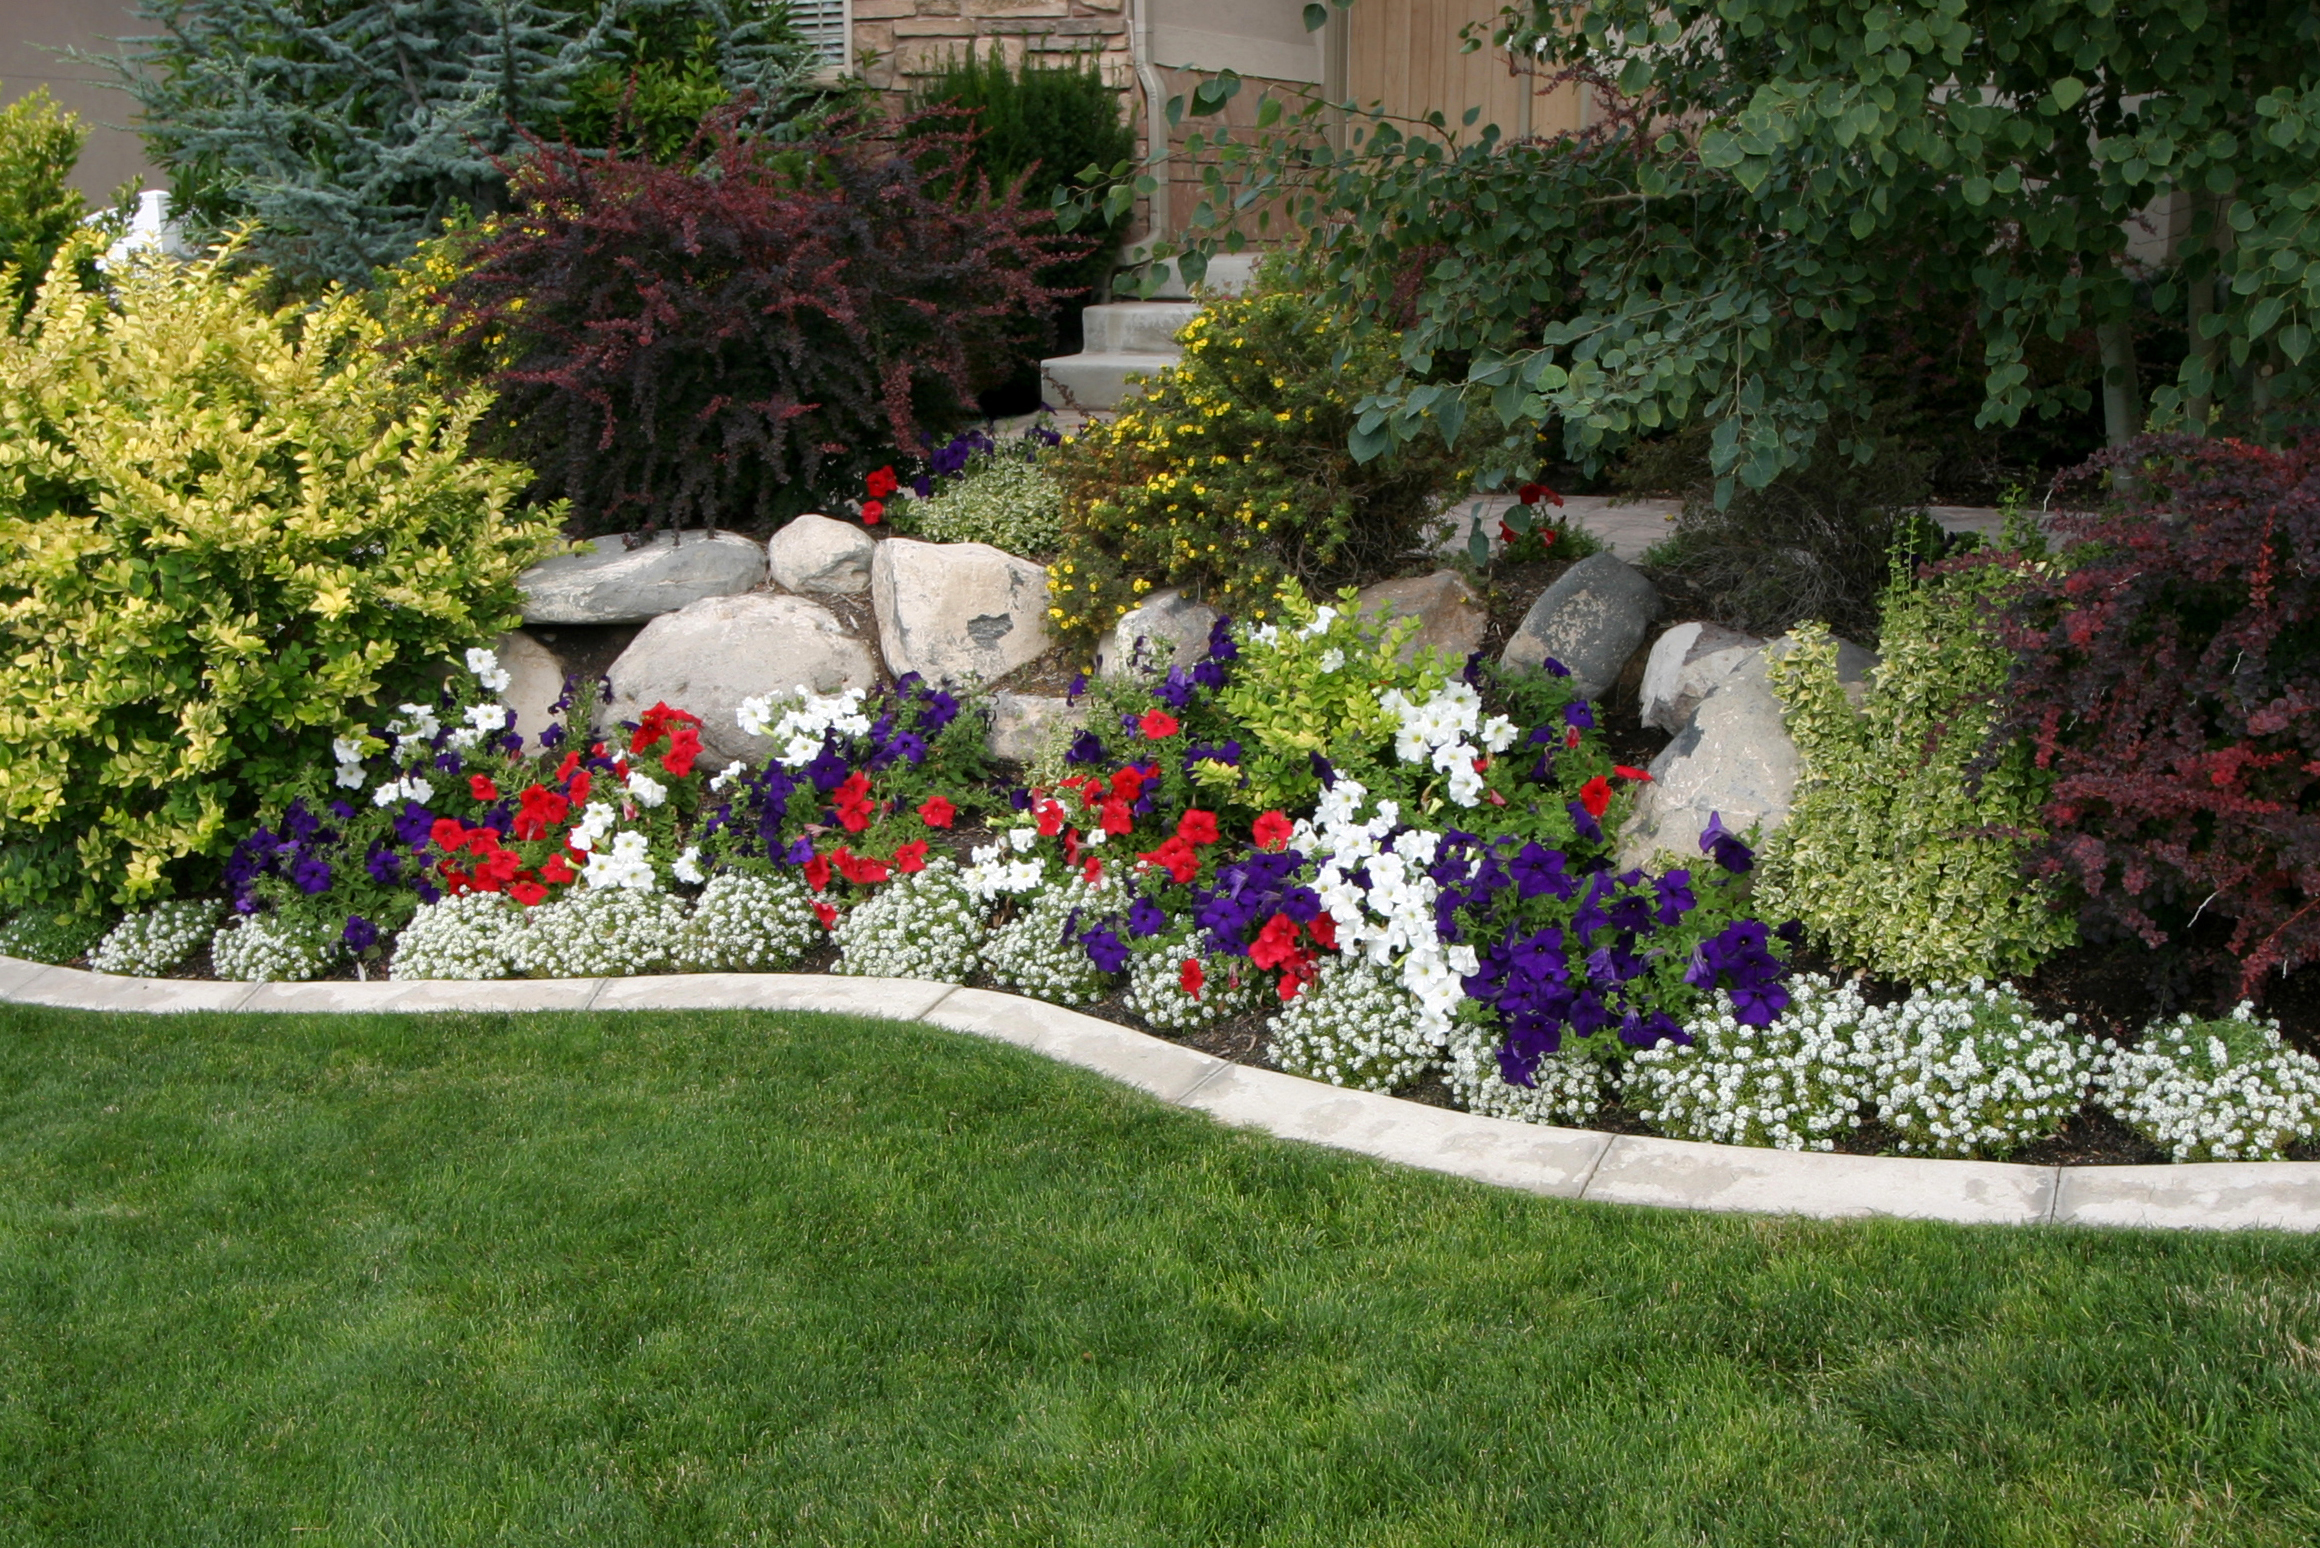
Home landscaping can be easy and fun for everyone in the family. In fact, even if you have a small front or backyard, fewer projects provide as big a boost to your curb appeal than landscaping. And lucky for you there are plenty of landscaping projects of varying cost and complexity to choose from. Whether it’s planting a new flower garden, adding turf, trimming trees or installing landscape curbing, there is a DIY landscaping project for every homeowner out there. To keep things simple, we found five of the easiest landscaping projects around for you to consider trying this summer. Once completed, your home’s curb appeal will stand out from all the other houses on the block.

1. Add Colorful Flowers

If you walk outside and see a dull, boring landscape, you need some color. Colorful flowers provide a warm and welcoming feel to any landscape. They’re attractive to look at, and create a safe space for helpful wildlife like bees, birds, and earthworms.

Flowers fall into three categories: annuals, biennials, and perennials. Annuals are flowers that only last for a single growing season. You’ll want to plant these as soon as the last frosts are passed in order to get the best blooms from them.

Biennials last for two years, but don’t get really pretty until the second year. The first year, they will stay small, close to the ground, and mostly green. Year two, you’ll start to see flowers and more depth to the flowers.

Perennials are plants that can return again and again, season after season. During the winter months, the growth above-ground will die off and the plant may appear dead, but in the spring, they will start to green and bloom again.

Remember, don’t go too overboard with your flowers. If you overdo it, your landscaping maintenance costs could add up.

2. Mow Your Lawn & Cut In Edges

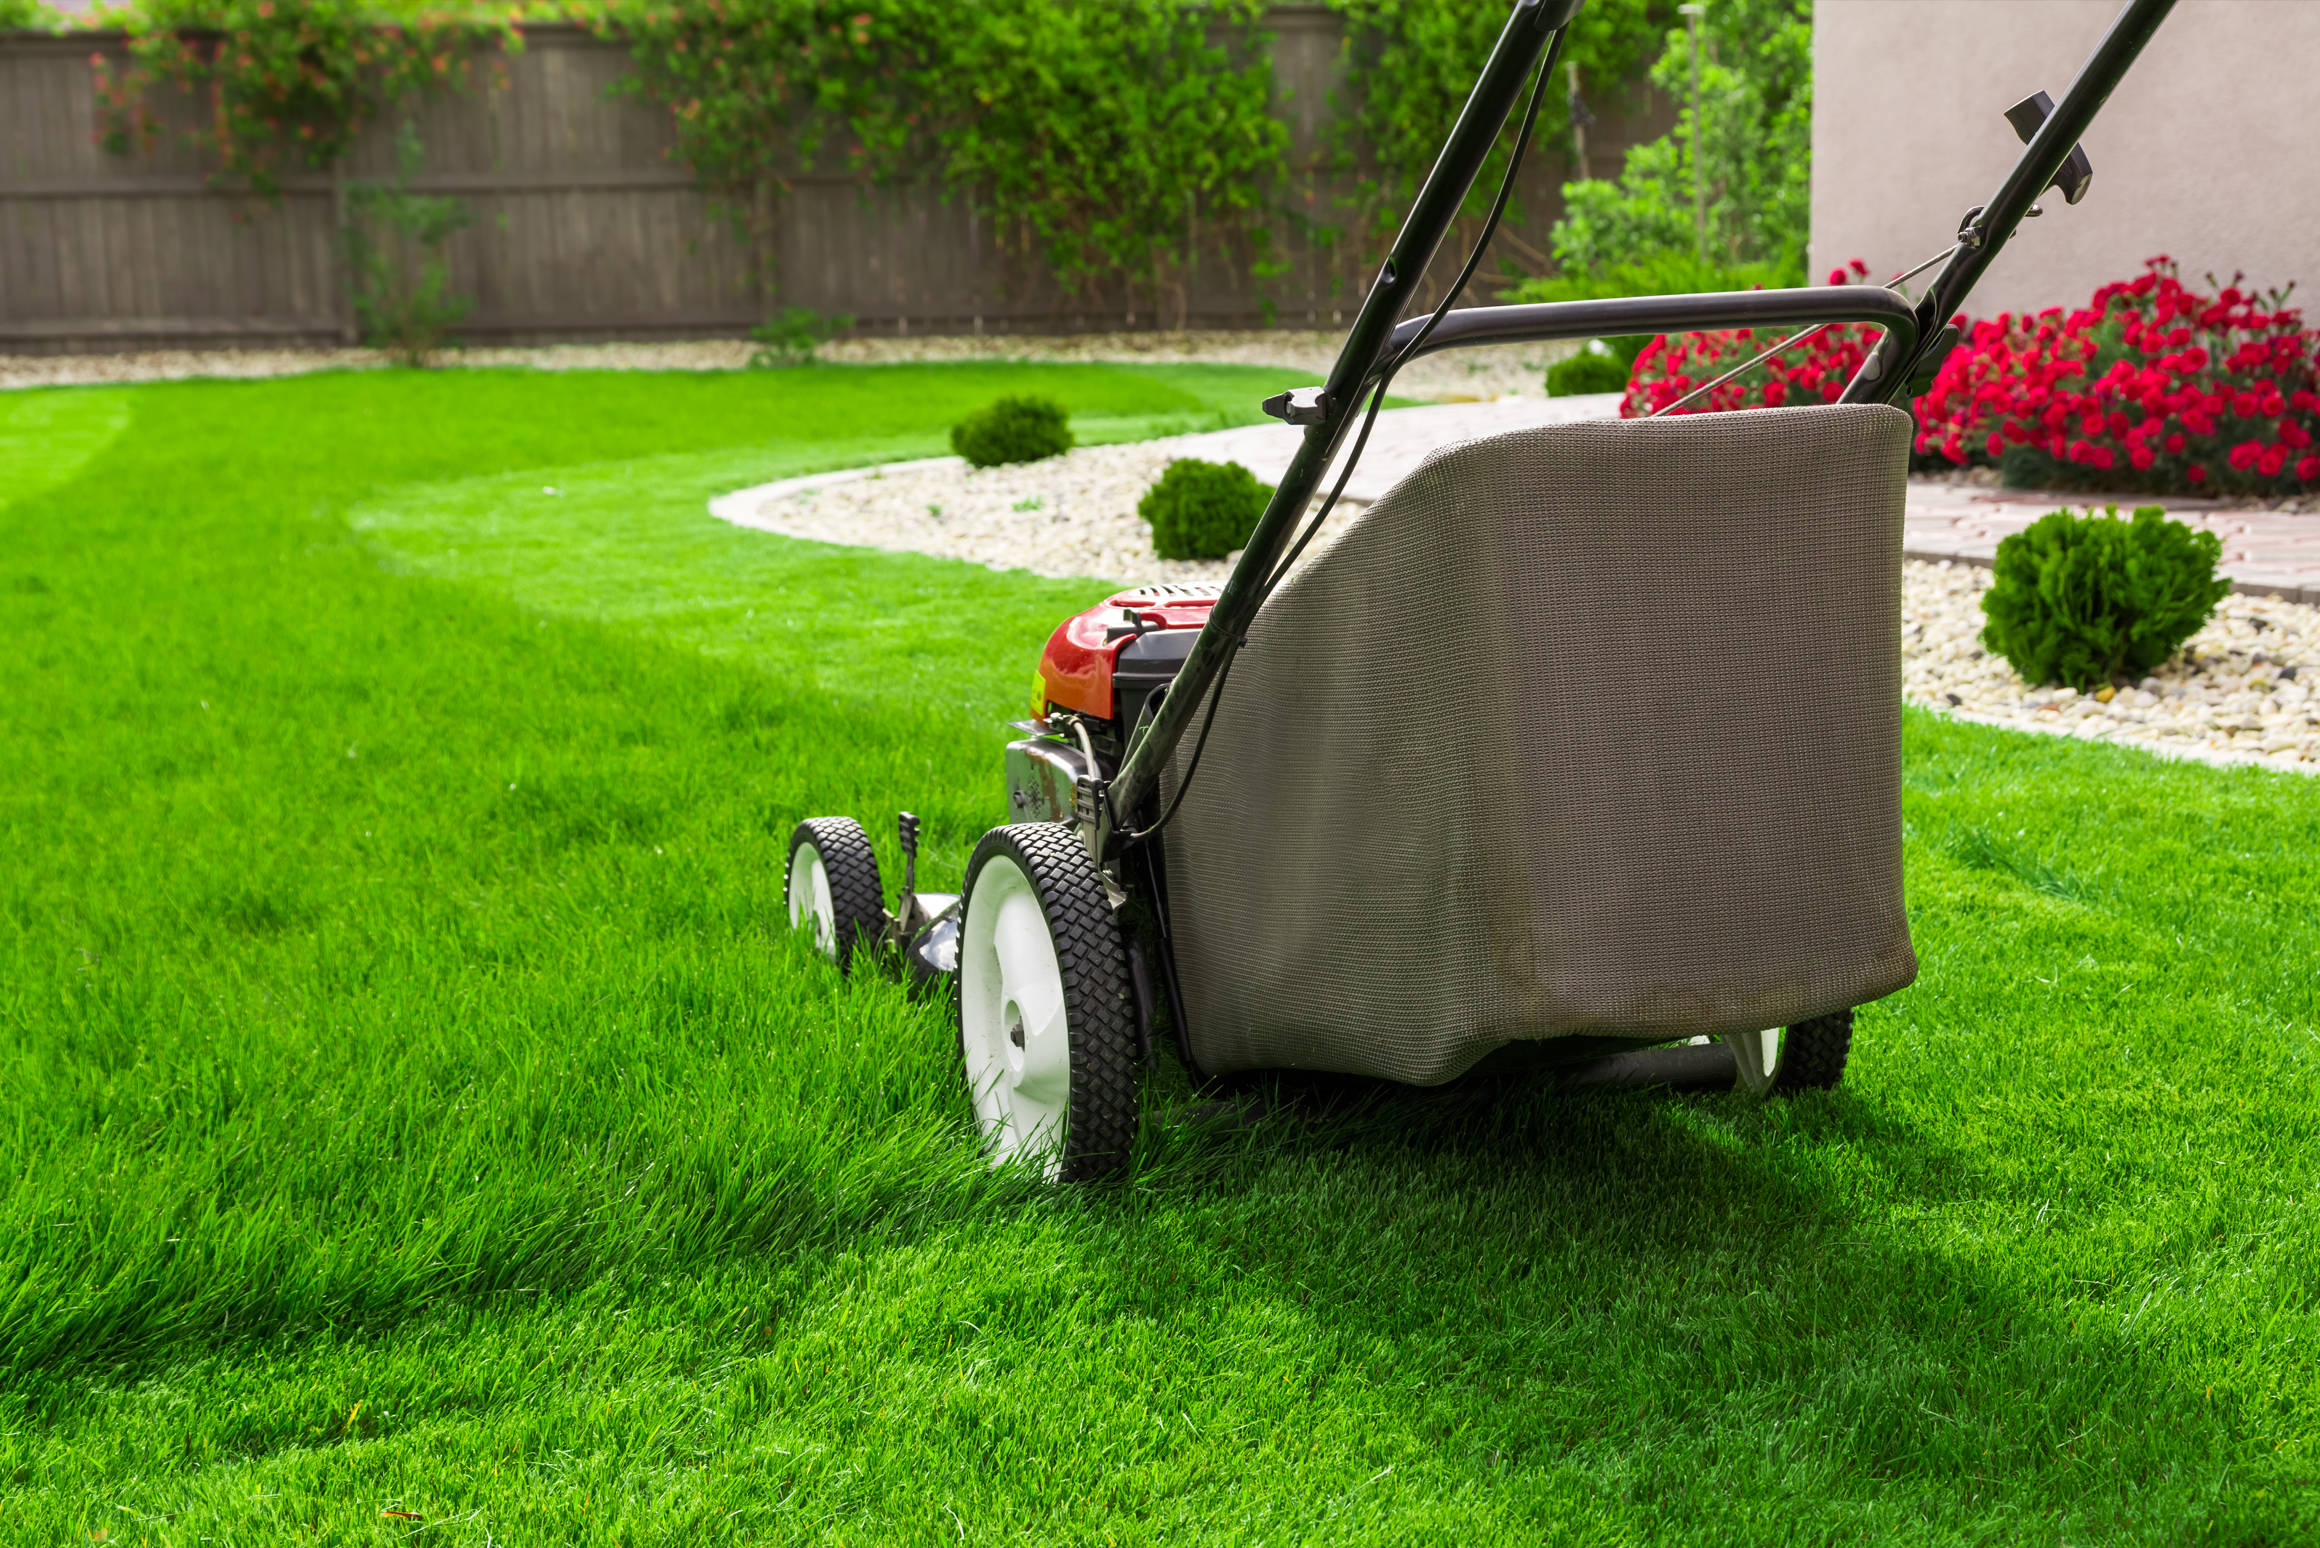
If you wanted to keep things even simpler than planting new flowers, regular maintenance can transform your backyard. When it comes to landscaping, maintenance always starts with mowing and cutting. During the summer, you should regularly mow your lawn. Sadly, there is no exact height all lawns should be, but the experts say to never take off more than 1/3 of the grass height. Once a week is ideal in the summer, but biweekly is acceptable in the early spring when rain is more frequent. If you miss a week, do not overdo it next week. Your lawn needs to be long enough to produce shade and protect sensitive roots from being exposed to sunlight. The Garden Counselor explains: “Taller grass will grow deeper roots, keep the soil moist and crowd out many weeds. Keeping grass mowed short limits the amount of root growth that occurs.” This is the only way your lawn will grow and keep its shiny, green exterior. Cutting your lawn too short ruins your grass and shocks your lawn system. In addition to regular mowing, active DIYers should edge their lawns. A neatly edged lawn along a sidewalk or driveway is a thing of beauty. Luckily, basic string trimmers can get the job the done.

3. Curb Your Landscape

If you’d like to add some precision or separation from your yard and walkway, driveway or house, then landscape curbing is a terrific and easy way to add some flare to your yard. Landscape curbing adds a decorative border around your lawn. Homeowners can use brick, pavers, or concrete to curb their landscapes, but if you want to minimize costs and keep this a DIY project, we highly recommend brick or pavers. Brick and pavers are easy to install and require little DIY expertise.

Once you pick out the perfect brick or paver for your landscape, start leveling the ground where the curbing will go. Pack in your brick and pavers and then surround them with gravel, sand, or landscape rocks. Make sure everything is packed in tightly and securely. Then sit back and enjoy the tidy new border around your lawn. Bear in mind, you can always change your curbed landscape if you change your mind in a few years. As opposed to concrete, pavers and brick are easy to remove and don’t require professional assistance.

4. Grow Vegetables

Few landscaping projects can teach your kids more about the earth and economy than growing vegetables. Not only will you get to spend quality time with your children, but it could also save you a few trips to the grocery store. If you’re serious about growing a vegetable garden, scheduling is key. Unlike watering or mowing your lawn, you cannot skip a day when it comes to vegetable gardens. They simply will not grow without regular upkeep. According to vegetable and landscaping experts, homeowners should plant shorter season edibles together and longer-season veggies in a separate section of the garden. This way, when the shorter season plants die off, you can plant more veggies on top of them and double your garden’s yield.

5. Add Lighting

Summers should be spent outside, but if you don’t have enough lighting around the house, how can you enjoy your glorious backyard at night? Whether you’re night swimming, stargazing or enjoying an after-dinner drink, homeowners need some source of light for their front and back yards. Luckily, when it comes to landscaping lighting, you have plenty of options to choose from.

String lights, or lanterns, are always an excellent choice for extra lighting. If placed strategically, they give a nice overall glow to a yard and reduce shadows. On the other hand, spotlighting and small lights along the patio or walkway work well if you’re looking for more shadows and brighter patches of light. If you’ve spent months working on improving your backyard, you owe it to yourself to light your space – enjoy all your hard work by day and night!

Improving and updating your home’s landscape may seem daunting, but with these easy, DIY landscaping ideas, it can slowly turn into the crown jewel of the neighborhood.

Recent Articles

Alex Rivera

July 10, 2023 • 3 min read

Alex Rivera

July 10, 2023 • 2 min read

Alex Rivera

July 7, 2023 • 2 min read

Back to top